前々から電子ペーパーには興味があったのですが、なかなか手軽に遊べる製品が無くて二の足を踏んでいました。
とにかく高すぎるんですよ。ペーパー、紙というイメージとはほど遠い価格です。まぁ、所詮は微細加工技術で作った特殊なディスプレイに過ぎません。
それに良い製品があまりないということもあります。これも紙のように何にでも使えるというイメージからはほど遠い状態です。
私が欲しかったのは紙の代わりに電子的に「印刷」できるデバイスです。単にPCにUSBで接続して、任意の画像が表示できればそれだけで良いのです。それに予定表とかカレンダーとかを表示させてPCの電源が入っていなくても常に表示させておけるようなものが欲しかったのです。たかだかそれだけのために高価なペンデバイス付きのタブレットを買おうとは思いません。最近は7インチくらいであればデジタルフォトフレームとして使える電子ペーパー製品も探せば見つかるようにはなってきました。もうしばらく待てば安価で良い製品が手に入るようになるかもしれませんが、現状ではまだまだといったところです。
手に入らないのであれば自分で作るしかありません。幸い電子工作に使うための電子ペーパーモジュールはいろんな所で見かけます。
それらはRaspberry Pi等のマイコンボードから制御することを想定しているようですが、私はいつも疑問に思います。目の前にPCがあるのになんでそんなものから制御しなきゃならないのかと。PCのUSBに接続して制御できないものかと。
お買い物
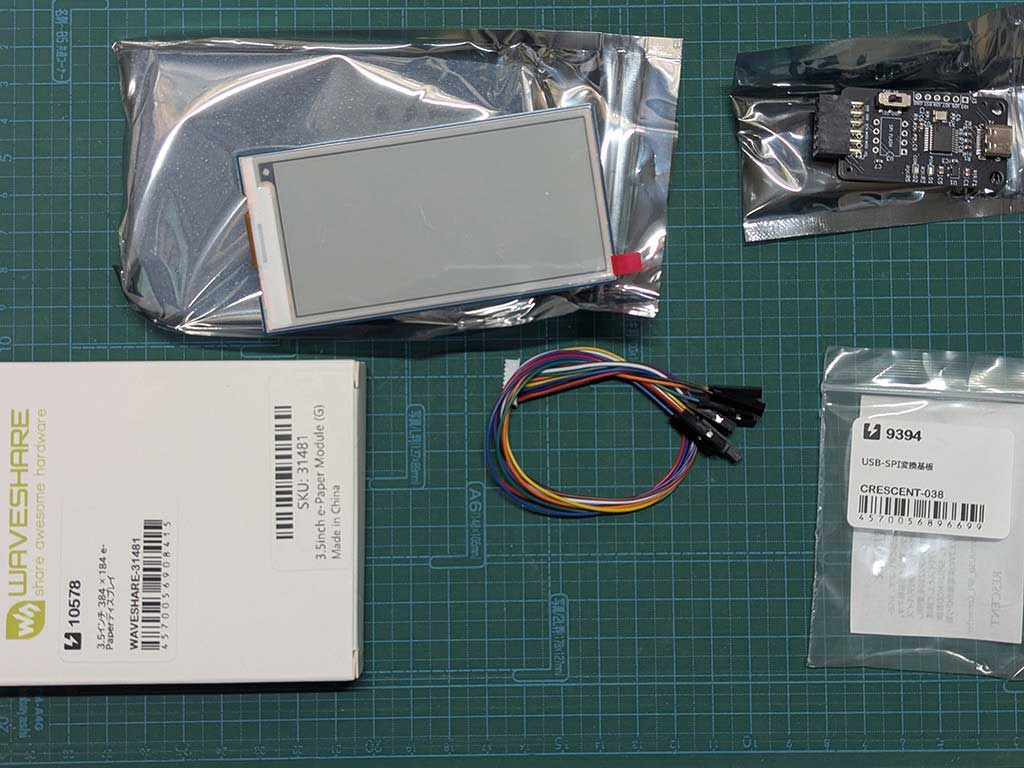
というわけで条件に合う製品を探したところ、次のものが見つかりました。
- Waveshare 3.5インチ 384 × 184 e-Paperディスプレイ — スイッチサイエンス (3388円)
- USB-SPI変換基板 — スイッチサイエンス (2800円)
- 1×40 両方長いピンヘッダ — スイッチサイエンス (154円)
Waveshareというメーカーの電子ペーパーモジュール(ドライバー基板付き)はSPIというシリアル通信方式(+いくつかの汎用IO)で制御できるみたいです。まずは手始めということで少し小さい3.5インチ(4色タイプ)のを選んでみました。失敗しても出費が痛くないので。
そしてそれをPCから制御するために選んだのがこのUSB-SPI変換基板です。PCからUSB経由で9つのGPIOと1つのSPIポートが制御可能です。この基板はMCP2210というチップを積んでいてPCからはHIDデバイスとして認識されるので専用のデバイスドライバーは不要なのだとか。その代わり大きなデータは64バイトのHIDレポートに分割して送信しなければならないので転送速度はあまり出ないようです。あまりスピードを重視しない目的であれば十分使えるでしょう。
ピンヘッダはUSB-SPI変換基板と電子ペーパーモジュール(Waveshare3.5インチ(G))を接続するのに必要になるものです。USB-SPI変換基板のPmodコネクタはメスで、電子ペーパーモジュールに付属するケーブルのコネクタもメスなので、間に挟むものが必要になります。
カートに入れて注文、支払いはGoogle Payで。営業日の午後に発送されて翌日ポストに入っていました。
接続
USB-SPI変換基板上には二つのコネクタがあります。一つは普通のUSB Type-Cコネクタです。PCと接続するために使います。もう一つはPmodという規格(Digilent Pmod Interface Specification)のコネクタです(Type 2A)。MCP2210から制御対象へ接続する信号線のほとんどはこのPmodコネクタに繋がっています。一部余っている信号線(GPIOの一部)は基板に穴だけあってピンやコネクタはありません。3.5インチパネルを制御するだけならPmodコネクタに出ている分だけで足ります。(ちなみに13.3インチ6色カラー(E)だと1本足りません)
USB-SPI変換基板のPmodコネクタ:
| #6:VDD | #5:GND | #4:SCK | #3:MISO | #2:MOSI | #1:IO1 |
| #12:VDD | #11:GND | #10:IO4 | #9:IO2 | #8:IO0 | #7:IO6 |
Waveshare側のコネクタ(3.5inch e-Paper Module (G) - Waveshare Wiki):
| #9:PWR | #8:BUSY | #7:RST | #6:DC | #5:CS | #4:SCLK | #3:DIN | #2:GND | #1:VCC |
ピンの意味:
| ピン名 | 役割 |
|---|---|
| VCC | 電源(3.3 V / 5 V 入力) |
| GND | グラウンド |
| DIN | SPI MOSI |
| SCLK | SPIクロック |
| CS | SPIチップ選択ピン(Lowでアクティブ) |
| DC | データ / コマンド選択(Highでデータ、Lowでコマンド) |
| RST | 外部リセットピン(Lowでアクティブ) |
| BUSY | Busyステータスアウトプットピン |
| PWR | Power on/off 制御 |

Waveshareの電子ペーパーモジュールにはいかにもマイコンボードと接続しやすそうなケーブルが付属していました。
そのケーブル(+両方長いピンヘッダ)を使ってこの二つを次のように接続してみました。できるだけPmod規格の意味論に合わせた結線にしてあります。
接続表:
| MCP2210 | Pmod 2A | e-Paper | Dir |
|---|---|---|---|
| IO1 | #1(CS) | #5(CS) | Out |
| MOSI | #2(MOSI) | #3(DIN) | Out |
| MISO | #3(MISO) | - | - |
| SCLK | #4(SCLK) | #4(SCLK) | Out |
| GND | #5(GND) | #2(GND) | - |
| VCC | #6(VCC) | #1(VCC) | - |
| IO6 | #7(INT) | #8(BUSY) | In |
| IO0 | #8(RESET) | #7(RST) | Out |
| IO2 | #9(CS2) | #6(DC) | Out |
| IO4 | #10(CS3) | #9(PWR) | Out |
となると後はソフトウェアですね。
Python用ライブラリのインストール
今回はPythonを使うことにします。ライブラリが揃っているみたいなので。MCP2210を制御するライブラリがすでにあり、ザッと見た感じ悪く無さそうなのでそれを使うことにしました。
pip install mcp2210-python
を実行したら依存しているhidapiパッケージのインストールでエラーが発生しました。(事前にVisual Studio Community 2022がインストール済みです)
>pip install mcp2210-python
Collecting mcp2210-python
  Downloading mcp2210_python-1.0.8-py3-none-any.whl.metadata (732 bytes)
Collecting hidapi (from mcp2210-python)
  Downloading hidapi-0.14.0.post4.tar.gz (174 kB)
  Installing build dependencies ... done
  Getting requirements to build wheel ... done
  Preparing metadata (pyproject.toml) ... done
Collecting setuptools>=19.0 (from hidapi->mcp2210-python)
  Using cached setuptools-80.9.0-py3-none-any.whl.metadata (6.6 kB)
Downloading mcp2210_python-1.0.8-py3-none-any.whl (10 kB)
Using cached setuptools-80.9.0-py3-none-any.whl (1.2 MB)
Building wheels for collected packages: hidapi
  Building wheel for hidapi (pyproject.toml) ... error
  error: subprocess-exited-with-error

  × Building wheel for hidapi (pyproject.toml) did not run successfully.
  │ exit code: 1
  ╰─> [29 lines of output]
      C:\Users\misohena\AppData\Local\Temp\pip-build-env-1spmig8n\overlay\Lib\site-packages\setuptools\dist.py:759: SetuptoolsDeprecationWarning: License classifiers are deprecated.
      !!

              ********************************************************************************
              Please consider removing the following classifiers in favor of a SPDX license expression:

              License :: OSI Approved :: BSD License
              License :: OSI Approved :: GNU General Public License v3 (GPLv3)

              See https://packaging.python.org/en/latest/guides/writing-pyproject-toml/#license for details.
              ********************************************************************************

      !!
        self._finalize_license_expression()
      running bdist_wheel
      running build
      running build_ext
      building 'hid' extension
      creating build\temp.win-amd64-cpython-314\Release\Users\misohena\AppData\Local\Temp\pip-install-ual6i7nx\hidapi_12f0f10a24b04ec4959d911d09e2c27e\hidapi\windows
      "C:\Program Files\Microsoft Visual Studio\2022\Community\VC\Tools\MSVC\14.44.35207\bin\HostX86\x64\cl.exe" /c /nologo /O2 /W3 /GL /DNDEBUG /MD -IC:\Users\misohena\AppData\Local\Temp\pip-install-ual6i7nx\hidapi_12f0f10a24b04ec4959d911d09e2c27e\hidapi\hidapi -IC:\app\Python314\include -IC:\app\Python314\Include "-IC:\Program Files\Microsoft Visual Studio\2022\Community\VC\Tools\MSVC\14.44.35207\include" "-IC:\Program Files\Microsoft Visual Studio\2022\Community\VC\Tools\MSVC\14.44.35207\ATLMFC\include" "-IC:\Program Files\Microsoft Visual Studio\2022\Community\VC\Auxiliary\VS\include" "-IC:\Program Files (x86)\Windows Kits\10\include\10.0.26100.0\ucrt" "-IC:\Program Files (x86)\Windows Kits\10\\include\10.0.26100.0\\um" "-IC:\Program Files (x86)\Windows Kits\10\\include\10.0.26100.0\\shared" "-IC:\Program Files (x86)\Windows Kits\10\\include\10.0.26100.0\\winrt" "-IC:\Program Files (x86)\Windows Kits\10\\include\10.0.26100.0\\cppwinrt" /TcC:\Users\misohena\AppData\Local\Temp\pip-install-ual6i7nx\hidapi_12f0f10a24b04ec4959d911d09e2c27e\hidapi\windows\hid.c /Fobuild\temp.win-amd64-cpython-314\Release\Users\misohena\AppData\Local\Temp\pip-install-ual6i7nx\hidapi_12f0f10a24b04ec4959d911d09e2c27e\hidapi\windows\hid.obj -DHID_API_NO_EXPORT_DEFINE
      hid.c
      "C:\Program Files\Microsoft Visual Studio\2022\Community\VC\Tools\MSVC\14.44.35207\bin\HostX86\x64\cl.exe" /c /nologo /O2 /W3 /GL /DNDEBUG /MD -IC:\Users\misohena\AppData\Local\Temp\pip-install-ual6i7nx\hidapi_12f0f10a24b04ec4959d911d09e2c27e\hidapi\hidapi -IC:\app\Python314\include -IC:\app\Python314\Include "-IC:\Program Files\Microsoft Visual Studio\2022\Community\VC\Tools\MSVC\14.44.35207\include" "-IC:\Program Files\Microsoft Visual Studio\2022\Community\VC\Tools\MSVC\14.44.35207\ATLMFC\include" "-IC:\Program Files\Microsoft Visual Studio\2022\Community\VC\Auxiliary\VS\include" "-IC:\Program Files (x86)\Windows Kits\10\include\10.0.26100.0\ucrt" "-IC:\Program Files (x86)\Windows Kits\10\\include\10.0.26100.0\\um" "-IC:\Program Files (x86)\Windows Kits\10\\include\10.0.26100.0\\shared" "-IC:\Program Files (x86)\Windows Kits\10\\include\10.0.26100.0\\winrt" "-IC:\Program Files (x86)\Windows Kits\10\\include\10.0.26100.0\\cppwinrt" /Tchid.c /Fobuild\temp.win-amd64-cpython-314\Release\hid.obj -DHID_API_NO_EXPORT_DEFINE
      hid.c
      hid.c(3161): warning C4267: '=': 'size_t' から 'int' に変換しました。データが失われているかもしれません。
      hid.c(4285): warning C4244: '=': 'Py_ssize_t' から 'int' への変換です。データが失われる可能性があります。
      creating C:\Users\misohena\AppData\Local\Temp\pip-install-ual6i7nx\hidapi_12f0f10a24b04ec4959d911d09e2c27e\build\lib.win-amd64-cpython-314
      "C:\Program Files\Microsoft Visual Studio\2022\Community\VC\Tools\MSVC\14.44.35207\bin\HostX86\x64\link.exe" /nologo /INCREMENTAL:NO /LTCG /DLL /MANIFEST:EMBED,ID=2 /MANIFESTUAC:NO /LIBPATH:C:\app\Python314\libs /LIBPATH:C:\app\Python314 /LIBPATH:C:\app\Python314\PCbuild\amd64 "/LIBPATH:C:\Program Files\Microsoft Visual Studio\2022\Community\VC\Tools\MSVC\14.44.35207\ATLMFC\lib\x64" "/LIBPATH:C:\Program Files\Microsoft Visual Studio\2022\Community\VC\Tools\MSVC\14.44.35207\lib\x64" "/LIBPATH:C:\Program Files (x86)\Windows Kits\10\lib\10.0.26100.0\ucrt\x64" "/LIBPATH:C:\Program Files (x86)\Windows Kits\10\\lib\10.0.26100.0\\um\x64" setupapi.lib /EXPORT:PyInit_hid build\temp.win-amd64-cpython-314\Release\Users\misohena\AppData\Local\Temp\pip-install-ual6i7nx\hidapi_12f0f10a24b04ec4959d911d09e2c27e\hidapi\windows\hid.obj build\temp.win-amd64-cpython-314\Release\hid.obj /OUT:build\lib.win-amd64-cpython-314\hid.cp314-win_amd64.pyd /IMPLIB:build\temp.win-amd64-cpython-314\Release\Users\misohena\AppData\Local\Temp\pip-install-ual6i7nx\hidapi_12f0f10a24b04ec4959d911d09e2c27e\hidapi\windows\hid.cp314-win_amd64.lib
      LINK : fatal error LNK1104: ファイル 'build\temp.win-amd64-cpython-314\Release\Users\misohena\AppData\Local\Temp\pip-install-ual6i7nx\hidapi_12f0f10a24b04ec4959d911d09e2c27e\hidapi\windows\hid.cp314-win_amd64.exp' を開くことができません。
      error: command 'C:\\Program Files\\Microsoft Visual Studio\\2022\\Community\\VC\\Tools\\MSVC\\14.44.35207\\bin\\HostX86\\x64\\link.exe' failed with exit code 1104
      [end of output]

  note: This error originates from a subprocess, and is likely not a problem with pip.
  ERROR: Failed building wheel for hidapi
Failed to build hidapi
error: failed-wheel-build-for-install

× Failed to build installable wheels for some pyproject.toml based projects
╰─> hidapi
何かをVC++でビルドしようとして.expファイルが無いからエラーになっているようですね。そしてそのパスが極めて奇妙。テンポラリディレクトリっぽいのに、あり得ないパスになっています。ははぁ、これは C:\ のせいだな……。
mkdir C:\tmp
set TEMP=\tmp
set TMP=\tmp
pip install hidapi
としたら無事にインストール成功。続く
pip install mcp2210-python
も成功しました。
デバイスの列挙
試しにUSB-SPI変換基板にアクセスしてみます。まずはHIDデバイスの列挙。
import hid

for device_dict in hid.enumerate():
    keys = list(device_dict.keys())
    keys.sort()
    for key in keys:
        print("%s : %s" % (key, device_dict[key]))
    print()
実行してみるとHIDデバイスの一覧が表示されます。マウスやキーボードなんかが出てきますね。その中に次のものがありました。
bus_type : 1
interface_number : 0
manufacturer_string : Microchip Technology Inc.
path : b'\\\\?\\HID#VID_04D8&PID_00DE#6&10c7683d&0&0000#{4d1e55b2-f16f-11cf-88cb-001111000030}'
product_id : 222
product_string : MCP2210 USB to SPI Master
release_number : 2
serial_number : 0002193217
usage : 1
usage_page : 65280
vendor_id : 1240
mcpP2210-pythonでIO3に接続されているLEDを点滅させる
USB-SPI変換基板のIO3にはLEDが接続されているので、ためしにそれを点滅させてみましょう。
import time
from mcp2210 import Mcp2210, Mcp2210GpioDesignation, Mcp2210GpioDirection

mcp = Mcp2210(serial_number="0002193217") # 上で見つけたシリアル番号を指定

mcp.configure_spi_timing(chip_select_to_data_delay=0,
                         last_data_byte_to_cs=0,
                         delay_between_bytes=0)

for i in range(9):
  mcp.set_gpio_designation(i, Mcp2210GpioDesignation.GPIO)
  mcp.set_gpio_direction(i, Mcp2210GpioDirection.OUTPUT)

mcp.set_gpio_output_value(3, True)
time.sleep(0.5)
mcp.set_gpio_output_value(3, False)
time.sleep(0.5)
mcp.set_gpio_output_value(3, True)
time.sleep(0.5)
mcp.set_gpio_output_value(3, False)
time.sleep(0.5)
mcp.set_gpio_output_value(3, True)
3.5インチ電子ペーパーパネルを制御してみる(塗りつぶし)
Waveshareが提供するサンプルコード( https://files.waveshare.com/wiki/3.5inch_e-Paper_Module_G/3in5_e-Paper_G.zip )を参考にしつつ次のようなコードを作成しました。
import time
from mcp2210 import Mcp2210, Mcp2210GpioDesignation, Mcp2210GpioDirection

PIN_CS = 1
PIN_DC = 2
PIN_COM_LED = 3
PIN_BUSY = 6
PIN_RST = 0
PIN_PWR = 4

PAPER_WIDTH       = 184
PAPER_HEIGHT      = 384

def init_mcp2210_for_paper(mcp):
    mcp.configure_spi_timing(chip_select_to_data_delay=0,
                             last_data_byte_to_cs=0,
                             delay_between_bytes=0)

    clear_mcp2210_gpio_status(mcp)
    mcp.set_gpio_designation(PIN_CS, Mcp2210GpioDesignation.CHIP_SELECT)
    mcp.set_gpio_direction(PIN_BUSY, Mcp2210GpioDirection.INPUT)
    mcp.set_gpio_output_value(PIN_RST, True)
    mcp.set_gpio_output_value(PIN_COM_LED, True)
    mcp.gpio_update()

def clear_mcp2210_gpio_status(mcp):
    for pin_number in range(9):
        mcp.set_gpio_designation(pin_number, Mcp2210GpioDesignation.GPIO)
        mcp.set_gpio_direction(pin_number, Mcp2210GpioDirection.OUTPUT)
        mcp.set_gpio_output_value(pin_number, False)

def power_on(mcp):
    mcp.set_gpio_output_value(PIN_PWR, True)
    mcp.gpio_update()
    time.sleep(0.2)

def reset(mcp):
    mcp.set_gpio_output_value(PIN_RST, True)
    mcp.gpio_update()
    time.sleep(0.2)
    mcp.set_gpio_output_value(PIN_RST, False)
    mcp.gpio_update()
    time.sleep(0.002)
    mcp.set_gpio_output_value(PIN_RST, True)
    mcp.gpio_update()
    time.sleep(0.2)
    wait_until_not_busy(mcp)

def wait_until_not_busy(mcp):
    time.sleep(0.1)
    while(mcp.get_gpio_value(PIN_BUSY) == False):
        time.sleep(0.005)

def send_command_code(mcp, command_code: int):
    mcp.set_gpio_output_value(PIN_DC, False)
    mcp.gpio_update()
    mcp.spi_exchange(bytes([command_code]), PIN_CS)

def send_data_bytes(mcp, data_bytes: bytes):
    mcp.set_gpio_output_value(PIN_DC, True)
    mcp.gpio_update()
    mcp.spi_exchange(data_bytes, PIN_CS)

def send_data(mcp,
              data: int | bytes | bytearray | tuple[int] | list[int]):
    if isinstance(data, int):
        send_data_bytes(mcp, bytes([data]))
    elif isinstance(data, bytes):
        send_data_bytes(mcp, data)
    else:
        send_data_bytes(mcp, bytes(data))

def send_command(mcp,
                 command_code: int,
                 *params: int | bytes | bytearray | tuple[int] | list[int]):
    send_command_code(mcp, command_code)
    for p in params:
        send_data(mcp, p)

def init_paper(mcp):
    send_command(mcp, 0x66, 0x49, 0x55, 0x13, 0x5D, 0x05, 0x10)
    send_command(mcp, 0x4D, 0x78)
    send_command(mcp, 0x00, 0x0F, 0x29)
    send_command(mcp, 0x01, 0x07, 0x00)
    send_command(mcp, 0x03, 0x10, 0x54, 0x44)
    send_command(mcp, 0x06, 0x0F, 0x0A, 0x2F, 0x25, 0x22, 0x2E, 0x21)
    send_command(mcp, 0x50, 0x37)
    send_command(mcp, 0x60, 0x02, 0x02)
    send_command(mcp, 0x61,
                 PAPER_WIDTH//256, PAPER_WIDTH%256,
                 PAPER_HEIGHT//256, PAPER_HEIGHT%256)
    send_command(mcp, 0xE7, 0x1C)
    send_command(mcp, 0xE3, 0x22)
    send_command(mcp, 0xB6, 0x6F)
    send_command(mcp, 0xB4, 0xD0)
    send_command(mcp, 0xE9, 0x01)
    send_command(mcp, 0x30, 0x08)
    send_command(mcp, 0x04)
    wait_until_not_busy(mcp)

def fill_all_pixels(mcp, color_byte: int = 0x55):
    size = ((PAPER_WIDTH + 3) // 4) * PAPER_HEIGHT
    send_command(mcp, 0x10, [color_byte] * size)

def refresh_display(mcp):
    send_command(mcp, 0x12, 0x00)
    wait_until_not_busy(mcp)

def shutdown_paper(mcp):
    send_command(mcp, 0x02, 0x00) # POWER_OFF
    time.sleep(0.1)
    send_command(mcp, 0x07, 0xa5) # DEEP_SLEEP
    time.sleep(2);

    mcp.set_gpio_output_value(PIN_RST, False)
    mcp.set_gpio_output_value(PIN_DC, False)
    mcp.set_gpio_output_value(PIN_PWR, False)
    mcp.gpio_update()
    # clear_mcp2210_gpio_status(mcp)
    # mcp.gpio_update()


mcp = Mcp2210(serial_number="0002193217",
              immediate_gpio_update=False)

print("Start")
init_mcp2210_for_paper(mcp)
print("Power ON")
power_on(mcp)
print("Reset")
reset(mcp)
print("Init Paper")
init_paper(mcp)

print("Fill")
fill_all_pixels(mcp, 0xaf) # 10(Yellow) 10(Yellow) 11(Red) 11(Red)
print("Refresh")
refresh_display(mcp)

print("Sleep")
time.sleep(5)

print("Fill")
fill_all_pixels(mcp)
print("Refresh")
refresh_display(mcp)

print("Shutdown")
shutdown_paper(mcp)

print("End")
黄色と赤のストライプが一面に表示されます。5秒待ってから、白一色に戻してから終了します。
画像を表示してみる
Pythonで画像を扱うにはpillowというライブラリを使うと良いみたいですね。
pip install pillow
ソースコードの方は次のようになります。既に他の電子ペーパーモジュール用に改良した後のものを3.5インチ用に一部戻したので過度に複雑になっています。電子ペーパーモジュールとの通信部分と電子ペーパーモジュールそのものに対する処理をクラスで分けてあります。
import time
import logging
import mcp2210
from abc import ABC, abstractmethod
from typing import Sequence
from PIL import Image, ImagePalette

logger = logging.getLogger(__name__)
logger.setLevel(logging.DEBUG)

class EPaperBridgeMCP2210:
    """MCP2210を使用したブリッジ"""

    def __init__(self, serial_number: str):
        self._pin_dc = 2
        self._pin_com_led = 3
        self._pin_busy = 6
        self._pin_rst = 0
        self._pin_pwr = 4
        self._cs_pin = 1
        self._reset_wait_times = (0.2, 0.002, 0.2)
        self._mcp = mcp2210.Mcp2210(serial_number, immediate_gpio_update=False)
        # self._mcp._spi_settings.bit_rate = 12000000
        self.init_mcp2210_for_paper()

    def init_mcp2210_for_paper(self):
        self._mcp.configure_spi_timing(chip_select_to_data_delay=0,
                                       last_data_byte_to_cs=0,
                                       delay_between_bytes=0)

        self.clear_mcp2210_gpio_status()
        self._mcp.set_gpio_designation(self._cs_pin, mcp2210.Mcp2210GpioDesignation.CHIP_SELECT)
        self._mcp.set_gpio_direction(self._pin_busy, mcp2210.Mcp2210GpioDirection.INPUT)
        self._mcp.set_gpio_output_value(self._pin_rst, True)
        self._mcp.set_gpio_output_value(self._pin_com_led, True)
        self._mcp.gpio_update()

    def clear_mcp2210_gpio_status(self):
        for pin_number in range(9):
            self._mcp.set_gpio_designation(pin_number, mcp2210.Mcp2210GpioDesignation.GPIO)
            self._mcp.set_gpio_direction(pin_number, mcp2210.Mcp2210GpioDirection.OUTPUT)
            self._mcp.set_gpio_output_value(pin_number, False)

    def power_on(self):
        self._mcp.set_gpio_output_value(self._pin_pwr, True)
        self._mcp.gpio_update()
        time.sleep(0.2)

    def reset(self):
        reset_value = True
        for wait_time in self._reset_wait_times:
            self._mcp.set_gpio_output_value(self._pin_rst, reset_value)
            self._mcp.gpio_update()
            reset_value = not reset_value
            time.sleep(wait_time)
        self.wait_until_not_busy()

    def power_off(self):
        self._mcp.set_gpio_output_value(self._pin_rst, False)
        self._mcp.set_gpio_output_value(self._pin_dc, False)
        self._mcp.set_gpio_output_value(self._pin_pwr, False)
        self._mcp.gpio_update()
        # self.clear_mcp2210_gpio_status(mcp)
        # self._mcp.gpio_update()

    def wait_until_not_busy(self):
        start_time = time.time()
        logger.debug("Start waiting (busy=%s)" % self._mcp.get_gpio_value(self._pin_busy))
        # time.sleep(0.1)
        while(self._mcp.get_gpio_value(self._pin_busy) == False):
            time.sleep(0.005)
        logger.debug("End waiting (wait time=%s seconds)" % (time.time() - start_time))

    def send_command_code(self, command_code: int):
        self._mcp.set_gpio_output_value(self._pin_dc, False)
        self._mcp.gpio_update()
        self._mcp.spi_exchange(bytes([command_code]), self._cs_pin)

    def send_data_bytes(self, data_bytes: bytes):
        self._mcp.set_gpio_output_value(self._pin_dc, True)
        self._mcp.gpio_update()
        self._mcp.spi_exchange(data_bytes, self._cs_pin)

    def send_data(self, data: int | Sequence[int]):
        if isinstance(data, int):
            self.send_data_bytes(bytes([data]))
        elif isinstance(data, bytes):
            self.send_data_bytes(data)
        else:
            self.send_data_bytes(bytes(data))

    def send_command(self, command_code: int, *params: int | Sequence[int]):
        self.send_command_code(command_code)
        for p in params:
            self.send_data(p)

class EPaperDisplayWaveshare(ABC):
    "Waveshare製EPaperディスプレイモジュール(HAT)の基底クラス"
    def __init__(self,
                 bridge: EPaperBridgeMCP2210,
                 width: int, height: int, bits_per_pixel: int,
                 palette: bytes, default_pixel_value: int,
                 all_driver_chip_numbers: Sequence[int]):
        self._bridge = bridge
        self._width = width
        self._height = height
        self._bits_per_pixel = bits_per_pixel
        self._palette = palette
        self._default_pixel_value = default_pixel_value
        self._all_driver_chip_numbers = all_driver_chip_numbers
        self.init()

    # Initialization

    def init(self):
        try:
            self._bridge.power_on()
            self._bridge.reset()
            self.init_driver_chips()
        except Exception:
            self._bridge.power_off()
            raise

    @abstractmethod
    def init_driver_chips(self):
        ...

    # Shutdown

    def shutdown(self):
        try:
            self.shutdown_driver_chips()
        finally:
            self._bridge.power_off()

    def shutdown_driver_chips(self):
        # self._bridge.wait_until_not_busy() ?
        # 07:Deep Sleep Command
        self._bridge.send_command(0x07, 0xA5)
        time.sleep(2)

    # Panel Power Control

    def power_on_panel(self):
        # 04:Power ON Command
        self._bridge.send_command(0x04)
        self._bridge.wait_until_not_busy()

    def power_off_panel(self):
        # 02:Power OFF Command
        self._bridge.send_command(0x02, 0x00)
        self._bridge.wait_until_not_busy()

    # Frame

    @abstractmethod
    def set_frame_bytes(self, frame_bytes: bytes):
        ...

    @property
    def width(self) -> int:
        """パネル全体の水平方向のピクセル数です。"""
        return self._width

    @property
    def height(self) -> int:
        """パネル全体の垂直方向のピクセル数です。"""
        return self._height

    @property
    def default_pixel_value(self) -> int:
        """デフォルトのピクセル値です。基本的に「白」を意味する値です。"""
        return self._default_pixel_value

    @property
    def frame_bits_per_pixel(self) -> int:
        """ピクセルあたりのビット数です。基本的に8以下の値です。"""
        return self._bits_per_pixel

    @property
    def frame_pixels_per_byte(self) -> int:
        """1バイトあたりのピクセル数です。"""
        return 8 // self._bits_per_pixel

    def make_filled_frame_byte(self, pixel_value: int):
        """1バイトの中を指定されたpixel_valueで満たしたものを返します。"""
        bpp = self.frame_bits_per_pixel
        pixel_value = pixel_value & ((1 << bpp) - 1)
        frame_byte = 0
        bitpos = 8 - bpp
        while bitpos >= 0:
            frame_byte |= pixel_value << bitpos
            bitpos = bitpos - bpp
        return frame_byte

    @property
    def frame_line_nbytes(self) -> int:
        """フレームバッファの1行のバイト数を返します。"""
        return ((self._width + self.frame_pixels_per_byte - 1) //
                self.frame_pixels_per_byte)

    @property
    def frame_nbytes(self) -> int:
        """フレームバッファのバイト数を返します。"""
        return self.frame_line_nbytes * self.height

    def fill_frame_with_byte(self, frame_byte: int):
        """フレームの全バイトをframe_byteで満たします。"""
        self.set_frame_bytes(bytes([frame_byte]) * self.frame_nbytes)

    def fill_frame(self, pixel_value: int):
        """フレームの全ピクセルをpixel_valueで塗りつぶします。"""
        self.fill_frame_with_byte(self.make_filled_frame_byte(pixel_value))

    def clear_frame(self):
        """フレームの全ピクセルを白一色で塗りつぶします。"""
        self.fill_frame(self.default_pixel_value)


    def frame_image_palette(self) -> ImagePalette.ImagePalette:
        return ImagePalette.ImagePalette("RGB", self._palette)

    def convert_image_to_frame_bytes(self, image: Image.Image) -> bytes:
        """imageをselfの仕様に合わせたフレームバイト列へ変換します。"""
        palette_image = Image.new("P", (1, 1))
        palette_image.putpalette(self.frame_image_palette())

        quantized_image = image.convert("RGB").quantize(palette=palette_image)

        src_bytes = quantized_image.getdata()
        src_w, src_h = quantized_image.size

        return bytes(EPaperDisplayWaveshare.convert_pimage_bytes_to_frame_bytes(
            src_bytes, src_w, 0, 0, src_w, src_h,
            self.width, self.height, self.frame_bits_per_pixel))

    @staticmethod
    def convert_pimage_bytes_to_frame_bytes(
            src_bytes,
            src_pitch: int,
            src_x: int, src_y: int, src_w: int, src_h: int,
            dst_w: int, dst_h: int, dst_bits_per_pixel: int) -> bytearray:
        scan_w = min(src_w, dst_w)
        scan_h = min(src_h, dst_h)
        dst_line_nbytes = (dst_w // (8 // dst_bits_per_pixel))
        dst_pitch = dst_line_nbytes
        dst_bytes = bytearray(dst_line_nbytes * dst_h)
        for y in range(scan_h):
            src = src_pitch * (src_y + y) + src_x
            dst = dst_pitch * y
            dst_bitpos = 8
            dst_byte = 0
            dst_bitmask = (1 << dst_bits_per_pixel) - 1
            for x in range(scan_w):
                dst_bitpos -= dst_bits_per_pixel
                dst_byte |= ((int(src_bytes[src + x]) & dst_bitmask)
                             << dst_bitpos)
                if dst_bitpos < dst_bits_per_pixel:
                    dst_bytes[dst] = dst_byte
                    dst = dst + 1
                    dst_bitpos = 8
                    dst_byte = 0
            if dst_bitpos < 8:
                dst_bytes[dst] = dst_byte
        return dst_bytes

    # Panel Update

    def update_panel(self):
        """現在のフレームをディスプレイの表示に反映します。"""
        # 04:Power ON Command
        self.power_on_panel()
        # 12:Display Refresh Command
        self._bridge.send_command(0x12, 0x00)
        self._bridge.wait_until_not_busy()
        # 02:Power OFF Command
        self.power_off_panel()

    def show_image(self, image: Image.Image):
        """imageを表示します。"""
        self.set_frame_bytes(self.convert_image_to_frame_bytes(image))
        print("Refresh")
        self.update_panel()


class EPaperDisplayWaveshare3in5G(EPaperDisplayWaveshare):
    """Waveshare 3.5インチ(G)"""

    def __init__(self, bridge):
        super().__init__(
            bridge = bridge,
            width = 184,
            height = 384,
            bits_per_pixel = 2,
            palette = bytes((0,0,0)+(255,255,255)+(255,255,0)+(255,0,0)+
                            (0,0,0)*252),
            default_pixel_value = 1,
            all_driver_chip_numbers = [0]
        )

    def init_driver_chips(self):
        self._bridge.send_command(0x66, 0x49, 0x55, 0x13, 0x5D, 0x05, 0x10)
        self._bridge.send_command(0x4D, 0x78)
        self._bridge.send_command(0x00, 0x0F, 0x29)
        self._bridge.send_command(0x01, 0x07, 0x00)
        self._bridge.send_command(0x03, 0x10, 0x54, 0x44)
        self._bridge.send_command(0x06, 0x0F, 0x0A, 0x2F, 0x25, 0x22, 0x2E, 0x21)
        self._bridge.send_command(0x50, 0x37)
        self._bridge.send_command(0x60, 0x02, 0x02)
        self._bridge.send_command(0x61,
                                  self._width>>8, self._width&255,
                                  self._height>>8, self._height&255)
        self._bridge.send_command(0xE7, 0x1C)
        self._bridge.send_command(0xE3, 0x22)
        self._bridge.send_command(0xB6, 0x6F)
        self._bridge.send_command(0xB4, 0xD0)
        self._bridge.send_command(0xE9, 0x01)
        self._bridge.send_command(0x30, 0x08)

    # Frame

    def set_frame_bytes(self, frame_bytes: bytes):
        """frame_bytesを電子ペーパーに転送します(まだ表示しない)。"""
        self._bridge.send_command(0x10, frame_bytes)


print("Load image")
#im = Image.open("3in5g.bmp")
im = Image.open("PXL_20251008_015247023~2.jpg")
print("Rotate")
im = im.rotate(-90, expand=True)

print("Create EPaper")
epaper = EPaperDisplayWaveshare3in5G(
    EPaperBridgeMCP2210(serial_number="0002193217"))

try:
    print("Resize")
    im = im.resize((epaper.width, epaper.height))
    print("Show Image")
    epaper.show_image(im)

    print("Sleep")
    time.sleep(5)

    # print("Fill")
    # epaper.fill_frame_with_byte(0xaf)
    # print("Refresh")
    # epaper.update_panel()

    # print("Sleep")
    # time.sleep(5)

    print("Fill")
    epaper.clear_frame()
    print("Refresh")
    epaper.update_panel()

finally:
    print("Shutdown")
    epaper.shutdown()

print("End")
パネルの解像度は184×384です(縦長)。1ピクセルは2ビットでMSBから詰めていき1バイトで4ピクセル入ります。つまり1行は184/4=46バイトです。全体では46*384=17664バイトとなります。これをコマンド0x10のパラメータとして送ってやり、その後パネルの電源(0x04)をON→リフレッシュ(0x12)→パネルの電源OFF(0x02)とすると実際の画面が更新されます。なお、転送に3秒、リフレッシュに15秒くらいかかります。
というわけで表示させてみたのがこちら。
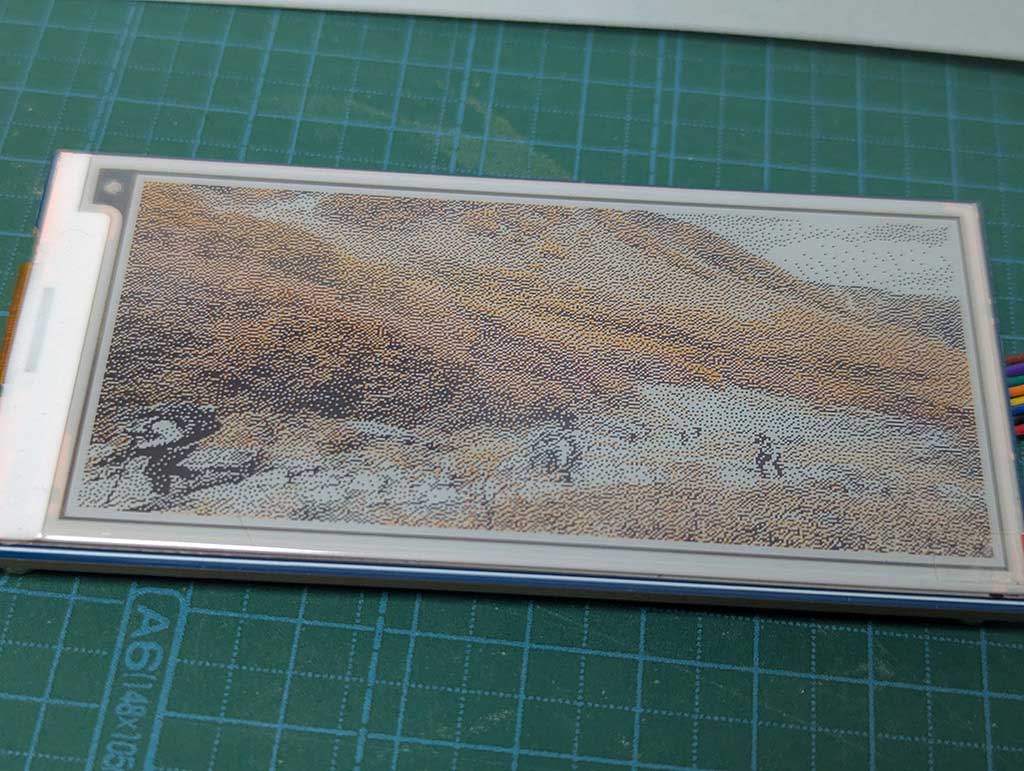
これは先日撮った紅葉の写真なのですが、黒白黄赤の四色しか無いのに案外色が再現できています。さすがに青空は灰色ですけど。
ちなみに元の写真はこんな感じです。

Pillowにはディザリングで減色する機能があるのでそれを利用しています。
テキストを含む画像を作成して表示させてみたのが次の例。
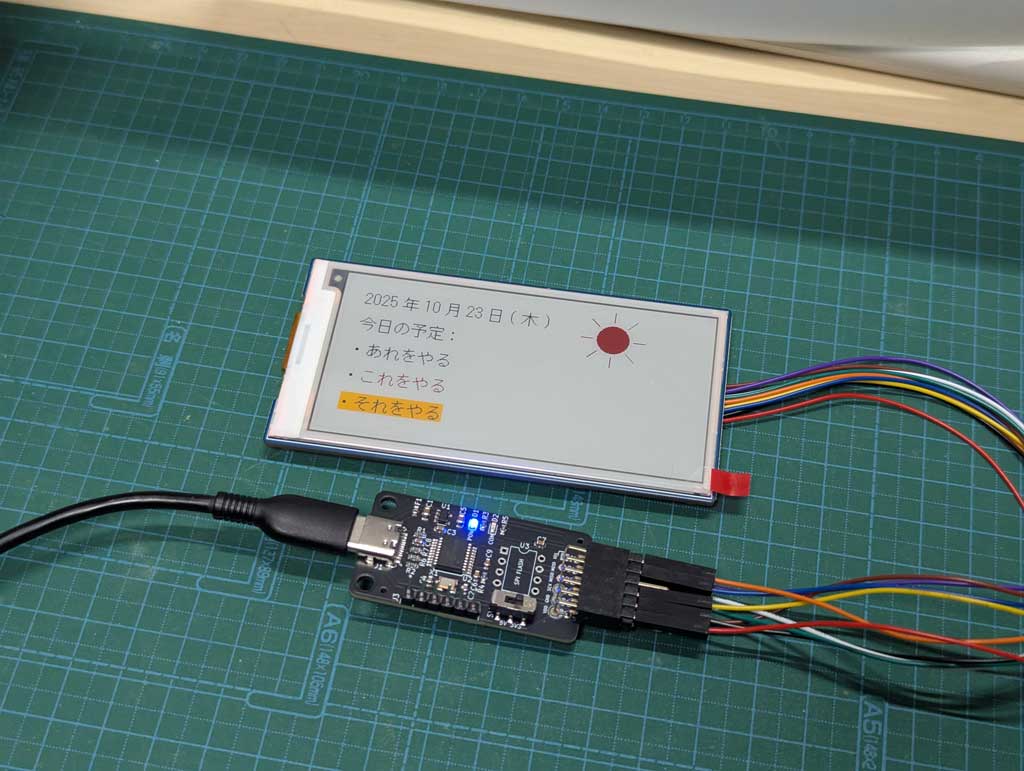
結構シャープに表示できています。
でも3.5インチだと大したものは表示できませんね。
……となると、もう少し大きいパネルが欲しくなってきますが、それはまた次回。
参考資料
- ハードウェア
- ソフトウェア